
When you build your first C/C++ application using SocketTools, you may encounter compile or link errors. These are usually the result of the project needing to be configured with the correct paths for the required header files and import libraries.
This article will focus on Visual C++ in Visual Studio 2019, however the same general information will apply to earlier versions of Visual Studio as well as other compilers and development environments.
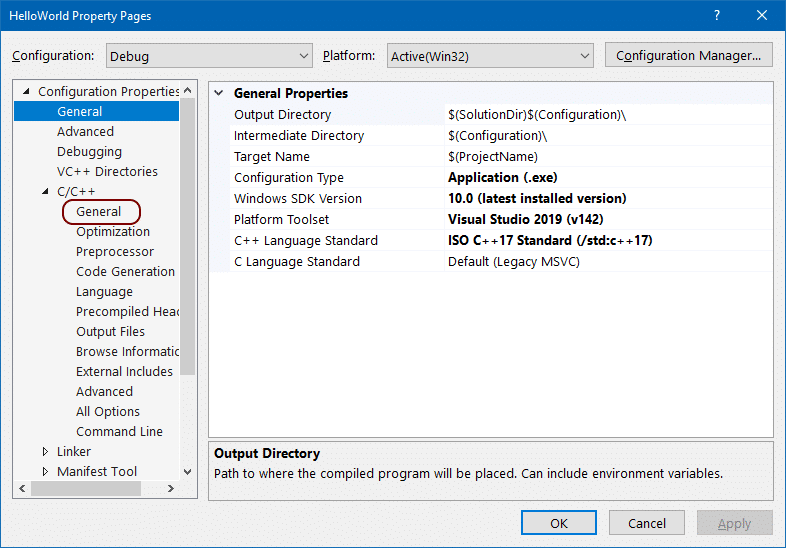
Whether you are creating an entirely new application, or you are incorporating SocketTools into an existing project, there are two principal configuration settings you need to check. To access your project settings, open (or create) your project, and select Project > Properties from the menu (or just right-click on the project name in the Solution Explorer and select Properties).
In Visual Studio, you would see a dialog which looks like this:
Include Directories
On the left-hand side, look for the C/C++ section and expand it. Then, select General to open the general properties. At the top of the properties page, you'll see Additional Include Directories:
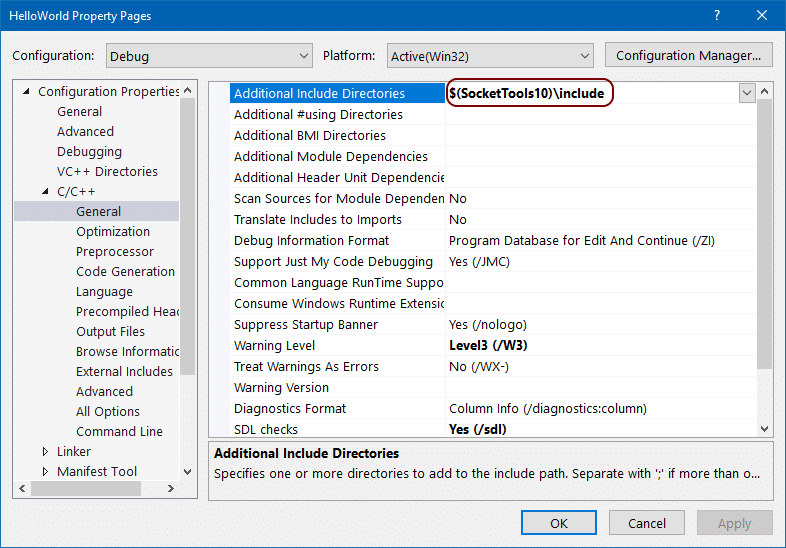
This is where you will need to add a path to the include files for SocketTools. Enter the following path:
$(SocketTools10)\include
To make things simpler, our installer automatically creates an environment variable named SocketTools10 which specifies the base installation path. You can use this variable in your path as shown above, rather than entering the full path name manually. Other versions of SocketTools have similarly named environment variables based on the major version number.
If there are already other paths in the configuration, you can simply add the SocketTools include folder to the end of that list. Click on the down arrow on the right side of the textbox and select Edit.
After you've added the path to the include folder, Visual C++ will be able to find the SocketTools header files. When you include the header in your source code, the compiler can resolve all the defines and function declarations.
One thing you do not want to do is provide an absolute path in your source code. For example, never include the SocketTools header file like this:
#include "/Program Files (x86)/SocketTools 10.0 Library Edition/Include/cstools10.h"
Although this can resolve the issue as to the compiler not being able to find the header file, if you were to ever change the installation path or move to another system where SocketTools was installed somewhere else, such as C:\Dev\SocketTools, your project would no longer compile.
Instead, simply use:
#include <cstools10.h>
Make sure the SocketTools10 environment variable points to the correct path where the SocketTools Library Edition has been installed and your projects will automatically use the correct location for the header files.
Import Libraries
To compile your project, you also need to tell Visual Studio where to find the import libraries for SocketTools. You may see an error message like this:
Build started...
------ Build started: Project: HelloWorld, Configuration: Debug Win32 ------
LINK : fatal error LNK1104: cannot open file 'csdnsv10.lib'
Done building project "HelloWorld.vcxproj" -- FAILED.
========== Build: 0 succeeded, 1 failed, 0 up-to-date, 0 skipped ==========
This means the linker was unable to find where the SocketTools import libraries were installed. These libraries provide information to the linker, telling which dynamic link libraries (DLLs) contain the functions you have called in your code.
You may be wondering why the linker is complaining about not being able to find the import library for the DNS API, even though you may not be using it in your application. This is because the SocketTools header file includes a group of pragmas (directives) which automatically links your application against all of the import libraries.
You don't need to worry about adding the names of individual SocketTools libraries into each of your projects, it's handled for you. Functions which aren't used won't be linked into your executable, so you don't need to worry about unnecessary code being included in your program.
You tell Visual Studio where to find the import libraries back in your project settings. Select Linker on the left side of the configuration properties, and then the General options. In the middle of that property page, there is a field for Additional Library Directories as shown here:
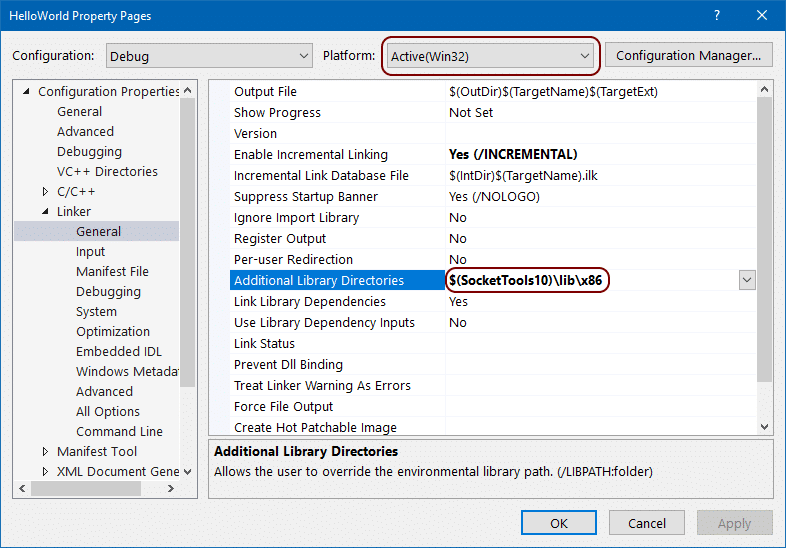
In this example, we have entered $(SocketTools10)\lib\x86 as the path to the import libraries. Just as we did with the include folder, an environment variable can be used to define where the base installation folder is for the version of SocketTools you are using.
There is one important thing to be aware of when selecting which import library path to use with your project, and this is the target platform you've selected. In the screenshot above, the current active platform is Win32, which is used for 32-bit (x86) projects. The same path would be used for both Debug and Release builds.
However, if your project targets 64-bit (x64) projects, you would need to change the path to SocketTools import libraries to be $(SocketTools10)\lib\x64 otherwise you will get linker errors. You cannot use the 32-bit import libraries with 64-bit projects, or the 64-bit libraries with 32-bit projects.
Keep in mind this is only with respect to the project type, not specifically which version of Windows the application will be running on. A 32-bit application will run on both 32-bit and 64-bit Windows. A 64-bit application will only run on 64-bit versions of Windows.
Now that you have your include folder and import library folder defined for your project, you will be able to compile and link your project.
Object File Formats
In this article, we have used Visual Studio 2019 for our example, however we provide import libraries in other formats which can be used by the Borland / Embarcadero compilers.
Microsoft's linker uses a format called PE-COFF (Portable Executable Common Object File Format) and we provide versions of the import libraries used to build the 32-bit (x86) and 64-bit (x64) dynamic link libraries.
You do need to match which target platform you are compiling for and use the correct import library. If your project targets the x64 platform and mistakenly uses the path to the x86 libraries, you will get linker error LNK2019 "unresolved external symbol" and warnings that the libraries conflict with the target machine type.
The Borland C++ compiler and Embarcadero C++Builder linkers use different object file formats. For 32-bit applications, they use a format called OMF (Object Module Format) and for 64-bit applications they use an object file format called ELF-64 (Executable and Linkable Object Format).
SocketTools provides both OMF and ELF import libraries for use with development tools which require them. They are found under the $(SocketTools10)\Lib folder where SocketTools was installed, along with the COFF x86 and x64 import libraries.
Library Dependencies
The SocketTools import libraries are not dependent on which specific version of Visual C++ is being used, which platform toolset is being used or which Windows SDK your project is using.
The same import libraries work for the Visual Studio 2017 toolset and Windows 10 SDK with the C++ 15 compiler as they do with the Visual Studio 2022 toolset and latest Windows 11 SDK with the C++ 17 compiler.
There are no runtime version dependencies, and your projects can use either the static link version of the Visual C++ runtime library or the multithreaded DLL version. Those choices do not affect which SocketTools import libraries you should link to.
See Also
SocketTools Library Redistribution
Supported Versions of Visual Studio